
exporting_mail_backup
Table of Contents
Exporting mail for Backup
NOTE : You cannot back up mail messages using the Outlook Web Application (OWA). You will need to be using the standalone version of Outlook.
Exporting to Gmail
Enabling IMAP Access from Gmail
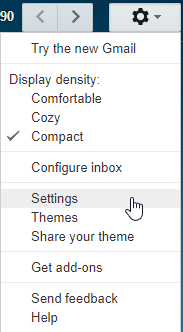
- From your mailbox, select the gear at the top-right.
- Within the gear menu, select Settings.
- This will load the settings page. Select Forwarding and POP/IMAP from the tabs at the top of the menu.
- Within the Forwarding and POP/IMAP menu, navigate to the IMAP Access sub-menu and select Enable IMAP.
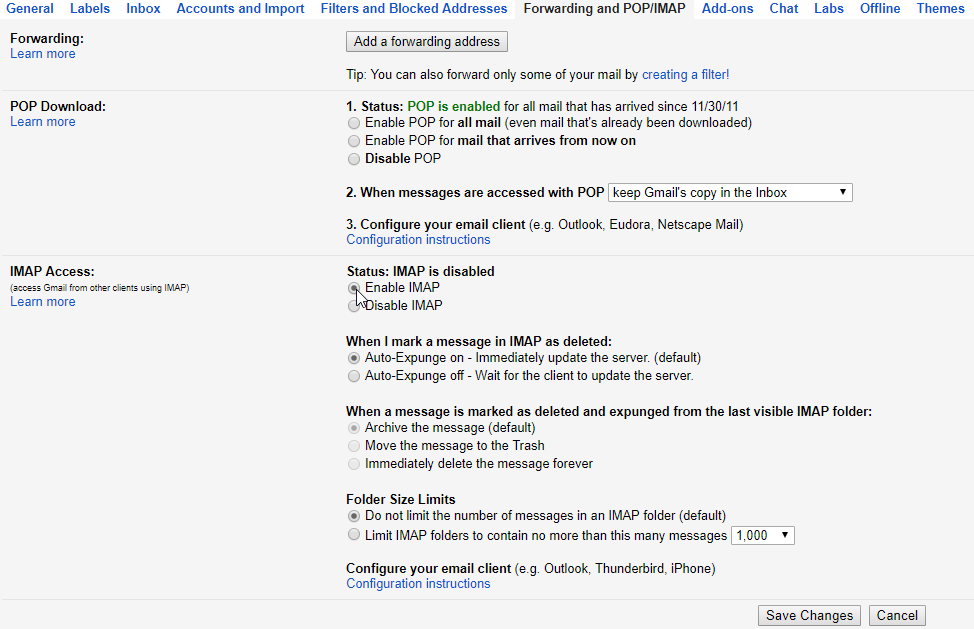
- Select Save Changes.


Adding Gmail Account to Outlook
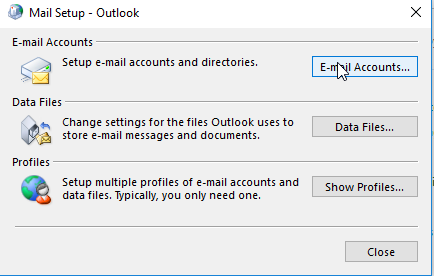
- Navigate to the computer's Control Panel.
- Select Mail from the Control Panel.
- Select E-mail Accounts from the Mail Setup window.
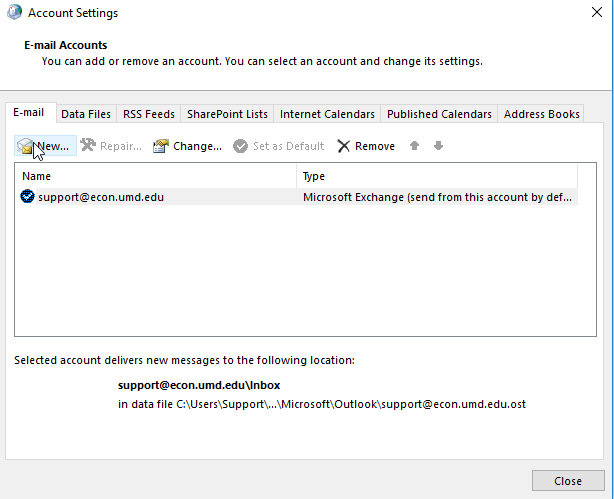
- Select New… from the Account Settings window.
- Enter your Gmail account information into the fields in the Add Account wizard and select Next.
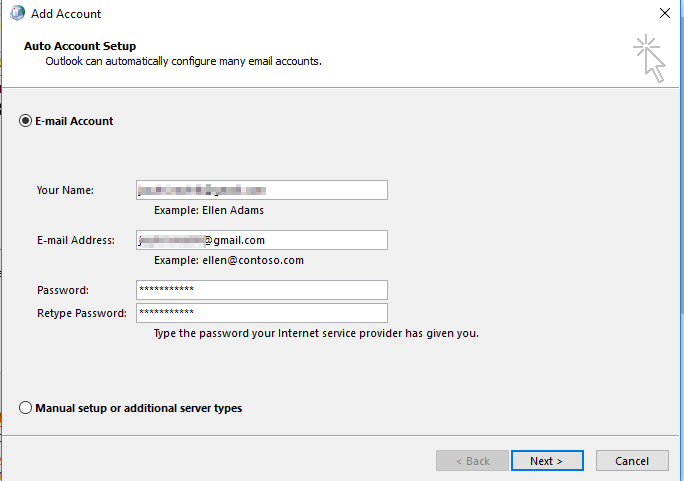
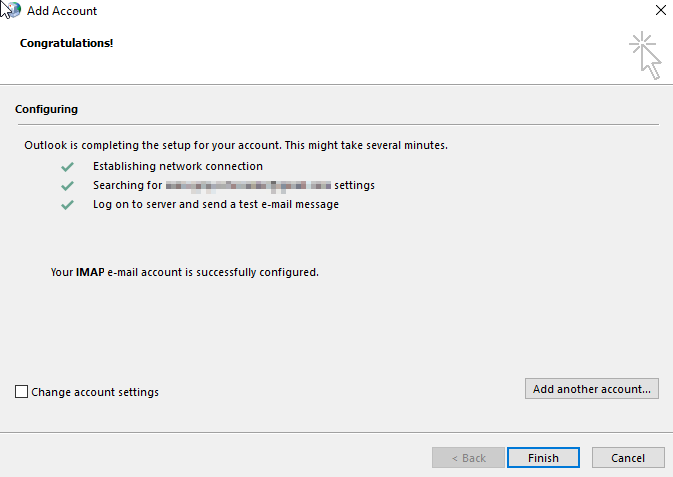
- Outlook will now attempt to connect and test the new account, and will notify you once it is done. Click Finish when it is finished.


Migrating Messages to Gmail
- Once Gmail is connected to Outlook, start Outlook.
- In the mailboxes on the left side of Outlook's primary window, you should see your Gmail mailbox located below your economics mailbox if it has successfully been connected.
- You can now begin copying messages over to your Gmail inbox. Start by right-clicking on the folder you wish to copy to Gmail, and selecting Copy Folder.
- This will bring up a prompt that asks you to specify the destination you wish to have the folder copied. Either select your Gmail mailbox itself, or a folder within your Gmail mailbox and click OK.
- The files will begin synchronizing, with its progress showing at the bottom of the Outlook main window. Once the process has completed, the messages will be in your Gmail mailbox.
Exporting to Outlook.com (Hotmail)
Adding Outlook.com Account to Outlook
- Navigate to the computer's Control Panel.
- Select Mail from the Control Panel.
- Select E-mail Accounts from the Mail Setup window.
- Select New… from the Account Settings window.
- Enter your Outlook.com (Hotmail) account information into the fields in the Add Account wizard and select Next.
- Outlook will now attempt to connect and test the new account, and will notify you once it is done. Click Finish when it is finished.
Migrating Messages to Outlook.com (Hotmail)
- Once Outlook.com (Hotmail) is connected to Outlook, start Outlook.
- In the mailboxes on the left side of Outlook's primary window, you should see your Outlook.com (Hotmail) mailbox located below your economics mailbox if it has successfully been connected.
- You can now begin copying messages over to your Outlook.com (Hotmail) inbox. Start by right-clicking on the folder you wish to copy to Outlook.com (Hotmail), and selecting Copy Folder.
- This will bring up a prompt that asks you to specify the destination you wish to have the folder copied. Either select your Outlook.com (Hotmail) mailbox itself, or a folder within your Outlook.com (Hotmail) mailbox and click OK.
- The files will begin synchronizing, with its progress showing at the bottom of the Outlook main window. Once the process has completed, the messages will be in your Outlook.com (Hotmail) mailbox.
Exporting to a PST File
Follow these steps to export a specific folder as a PST file:
- Click the File tab.
- In the Outlook Options window, click Advanced.
- Click Export.

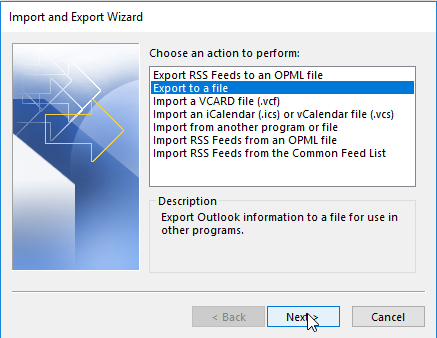
- In the Import and Export Wizard, click Export to a file, and then click Next.
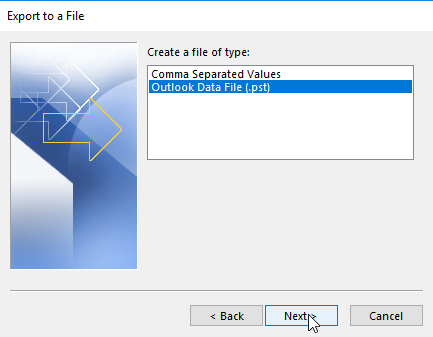
- Click Outlook Data File (.pst), and then click Next.
- Select the folder to export, and then click Next. Note: If you wish to export all of your folders, select your e-mail address at the top of the menu. Make sure Include subfolders is checked.

- Click Browse, and then select the location where you want the new .pst file to be saved.
- In the File Name box, type the name that you want to use for the new .pst file, and then click OK.
- Click Finish.


exporting_mail_backup.txt · Last modified: 2018/09/27 15:56 by support